Using the five pentatonic positions to create a smooth flowing guitar solo
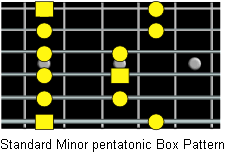
How much can you really do with a pentatonic scale and it’s five positions? Other than moving up or down an octave, you still only get five notes to play with. Thirteen frets of a guitar covers a maximum of three octaves. The common minor pentatonic “box” pattern covers just over two octaves.
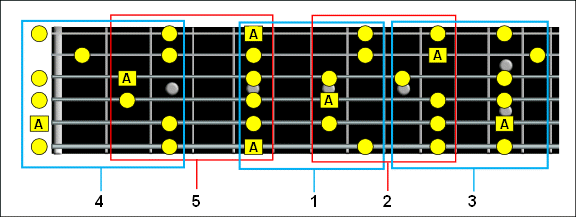
Take a look at the following diagram, it shows the five positions for the A minor pentatonic scale up to the thirteenth fret. The open strings are used for this example, therefore the five positions effectively require a coverage of fourteen frets.

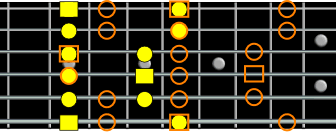
Now take a look at the diagram below. The green notes are the standard minor pentatonic shape. The only notes right up to the thirteenth fret that aren’t available in the standard position are those notes in red. So what do you gain by using five pentatonic positions rather than just sticking around the easy box pattern? Four extra notes, that’s it! Seems almost pointless in that light doesn’t it. Four notes is all you gain by using five positions instead of one!

Obviously there are some benefits to knowing the five positions but for most beginner and amateur guitarists the benefits rarely add up to much more than the re-location of limited ideas, merely playing with the same group of notes somewhere else. Making real use of the whole fretboard boils down to experience and to be honest, the more experience you gain, the less you find yourself thinking about pentatonic positions. Eventually you should view the pentatonic scale across the neck as a whole series of ideas and possibilities that, it just so happens, can be pieced together to create five positions that you don’t really care much about. Either way, you should still learn them, as contradictorary as it may sound. Experience can take over after you have put them to some use, something with a bit more point than just moving a set of notes elsewhere. One such use would be creating a smooth flowing note movement over chords and key changes.
Smoothing the Changes
The ability to create smooth sounding solos that flow naturally between chord and key changes is something that takes quite a lot of experience and is one area that can make a solo stand out between sounding like you really know what you are doing or not. This applies to chord changes that remain in the key as well as those that move out of key. Choosing notes within your solo that make the transition between chord changes using chord tones with minimal movement will always sound natural.
This is best learned by getting on and trying it out for yourself, I’ll guide you through some ideas to play around with. The backing track we are going to use is the funky thirds jam track. It’s a basic minor chord jam that moves up in thirds. The chords are as follows..
- Am7 / Cm7 / Ebm7 / F#m7
None of these chords belong together in the same key therefore the key centre changes with each chord. To jam over this track we can use the minor pentatonic scale with respect to each chord. Start with the A minor pentatonic, then the C minor pentatonic etc.. After the last chord we end up back at the beginning and start over.
First things first, let’s spend some time playing along to the backing track.
Exercise 1. Playing over the chord changes
Jam along to this backing track using the standard pentatonic pattern over each chord.

Use this pattern at..
- Fifth fret for A minor pentatonic
- Eighth fret for C minor pentatonic
- Eleventh fret for Eb minor pentatonic
- Fourteenth fret for F# minor pentatonic
Play around with those positions however you like while getting used to the chord changes.
Exercise 2. The smooth change
Making a lead line sound as smooth as possible over chord changes relies on two things.
- Keeping interval movements short.
- Landing on chord tones over the chord changes.
In other words we are trying to make the transfer as subtle as possible while changing from one chord to the next. If you’re not exactly sure what that means then this should give you the idea. Try playing the top three strings of a C chord and then an A minor chord in the normal open positions, then compare it to the A minor at the fifth fret. The transition between the first example is a lot smoother because only one note is moving up two semitones from G to A. In the second example the same thing is happening but the A ends up a octave higher, a jump of fourteen semitones.

Example 1
E||------------0--------------0----|------------0--------------0----||

B||-------1--------------1---------|-------1--------------1---------||

G||--0--------------0--------------|--2--------------2--------------||

D||--------------------------------|--------------------------------||

A||--------------------------------|--------------------------------||

E||--------------------------------|--------------------------------||
Example 2
E||------------0--------------0----|------------5--------------5----||

B||-------1--------------1---------|-------5--------------5---------||

G||--0--------------0--------------|--5--------------5--------------||

D||--------------------------------|--------------------------------||

A||--------------------------------|--------------------------------||

E||--------------------------------|--------------------------------||
Both examples clearly reflect the chord changes because each phrase consists of chord tones. Both ideas work well but there’s no doubt that the first one sounds smoother.
How can we relate this to playing with scales?
Playing a solo using nothing but chord tones can sound a bit too much like elevator music but the good thing is we don’t need to use all the chord tones to create a natural flowing solo that reflects the chord changes. Our guitar solos for the most part don’t really need to highlight the chord tones for the duration of the chord. What really nails home the chord change is the note you play or emphasize at the moment the chord changes.
Exercise 3 – Emphasizing the changes
Here are some things that make your solos really work well with the chord changes.
1. Short intervals as described previously for a smooth flow.
2. Landing on chord tones over the changes. This can be considered an end of phrase note, ending a phrase on a chord tone at the moment the chord changes is the what really emphasises the change.
3. Don’t fly straight past the emphasis. If you are playing a long series of scale note runs with no pauses then emphasising chord changes becomes pointless. Although a chord change can still be emulated in your solo by using arpeggio runs, that’s not what this lesson is about.
4. Don’t move too fast away from previous chord or phrase you were just playing. There would be times where this wouldn’t work but most rock / blues solos it works well. Just as we have looked at leading into a chord change smoothly, we can also leave the previous chord gracefully. You’ll see this in action in the next example.
There are also a few other things that can add a bit of punch to the changes. Bending into the landing note can create a nice effect to the change but also choosing the best sounding landing note. The root or the fifth are often weaker than the third or seventh for instance. This can lead to a compromise between best note and smallest interval, you just have to experiment and see what sounds best. Obviously if you are improvising on the fly then you wont think this fast unless you have a vast amount of experience and a great ear. If however you have had a bit of time to work with a piece of music beforehand then you would probably have already found the sweet notes for the changes.
The thing is not to think about any of this as a set of rules, just use the ideas in your practice schedule and do it all ten million times 🙂 Eventually your trained ear and your experience will make great sounding changes without worrying about how or what you done to make it happen, you’d have done it so much that it will just happen on autopilot.
Okay, let’s see this idea in action with what I call the caterpillar exercise. We are going to use the same pentatonic box positions as we did in the first exercise but only using the D and G strings. For this we are going to move up the neck “toggling” between position 1 minor pentatonic for the currently played chord and position 5 for leading into each chord that follows. I’ll spell it out with pictures just so that we’re clear.
To be honest I’ve never studied a caterpillar’s movements in any detail 🙂 but the image of it I have in my head is how I visualise this exercise of moving along the neck, instead of jumping between scale positions we edge our way along without leaving the previous chord scale too abruptly. This gives us two smoothing effects, as well as entering the chord change gracefully we also leave the previous chord gracefully. All should become clear in a moment, lets look at the scale positions. If you don’t know the difference between your one and five positions then go check them out in the pentatonic lesson first.
A minor pentatonic position 5 and 1 overlapping.

Move the whole thing up three frets for C minor pentatonic position 5 and 1 overlapping.

Obviously we can move the same thing along another three frets for Eb minor and then another three for F sharp minor.
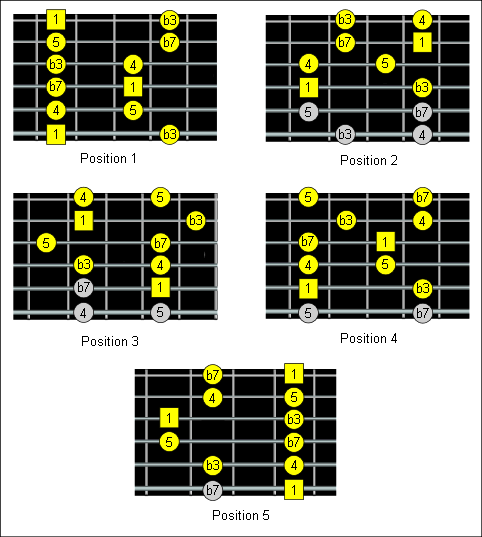
Now take a look at the intervals for the minor pentatonic scale positions 5 and 1. For this exercise we are interested in the minor third on the G string that overlaps the two positions, this will be our target tone for the chord changes.

Remember this is an exercise, not a rule. I feel the urge to repeat it because now I’m going to lay out a rule … but it’s only specific to this exercise. The idea is to do it enough to get your ear used to making smooth changes. Once you feel comfortable then you can go wild!.
The entire chord progression moves in thirds. We’ll use one set of rules now to move from one chord to the next. The same thing is then repeated along the neck so I’ll just show the transition between A minor and C minor. Here is the procedure.
First, Study the way A minor pentatonic position 1 overlaps with C minor pentatonic position 5 and 1. Then concentrate on only using the D and G string parts of each pentatonic pattern.

A minor pentatonic position 1 with C minor pentatonic superimposed over the top
Play along using A minor pentatonic position 1 over the Am7 chord using strings D and G only.

Look for the target tone of the next chord. In this case it’s the flat third of C minor and it’s shown below in position 5. Note that only two notes have changed from the A minor position. Also, try using short intervals to lead into the target tone, moving from the D to the Eb creates only a semitone interval transition between the scale changes.

By using position five of the C minor pentatonic, it allows us to make a smooth transition from the A minor and gently lead our way in. Let that sound settle for a few beats and then move along to position 1 of C minor pentatonic.

We’re back where we started, only now it’s with the next chord. Repeat this same idea along the neck until you reach the F# minor.
Bringing it all closer together.
Now we get to to the nitty gritty. We’ve pretty much covered the technical details of making smooth changes. The only thing we want to do now is practice all of the above but keep the scales closer together on the fretboard. This is where you start to gain control of the fretboard and your solos. You could skip all of the above and jump straight in to using more positions but I wouldn’t recommend it and here’s why. If you find most of your solos are limited to the standard pentatonic box then it’s a large step forward getting used to playing around with other positions, let alone having to think about key changes as well. (Even though I don’t personally like the term “position’s,” it’s quite apt for this lesson.)
Spend some time doing what you do best and if that happens to be the standard pentatonic pattern then the above exercise is really going to get you prepared both in terms of the way you think and the way you listen. Once you feel comfortable with that, using the other positions becomes much much easier because you’ll have so much less to think about. You’ll know what to do, all that’s left is to find where to do it. 🙂
There’s a lot of options available to play over this jam track in one area. Look for as many as you can come up with and practice them all. The diagrams below give you some ideas to get started and the video should clear up any confusion, which hopefully there’s not too much of cos I’ve done such a great job of explaining it all, right? 🙂
Have fun!

I`ve benn playin for thirty-five years and wish I`d have had this shit thirty years ago. A big thanks dude!
THIS IS GREAT I HAVE BEEN PLAYING FOR 25 YEARS AND UNTIL NOW I HAVE BEEN STRUGGLING WITH TARGET NOTES AND PLAYING OVER CHORD CHANGES. THANKS ALOT
hi lee at last its begining to make sense! thanks mate
Hello Lee, I’m 49 and stuck at home with my leg in plaster!
I have to say that I’ve learned more from your site – especially soloing over key changes – in the past two days than I have in 10 years of rooting through unusable scales and tabs of other peoples’ solo’s. Well done – and thanks!
Thanks Pete, glad it’s helping and hope the leg gets better soon!
Thank you Lee for having a good free lessons about guitar and other instrument.
Thanks aloooooooooooootttttt for this lesson bro 🙂
Hi Lee
Thanks for these great lessons.
Ive studied modes, scales and all the other shit and wish i had this concept ten years ago.
Cheers!!!!!
Gary!
This is the only online pentatonic information that doesn”t kid you about shortcuts.
I think the problem is most ‘teachers’ are unable to put themselves mentally where the student is. Lee you are the exception. Thank you very much for the way you teach. Keep it up!
Can you give me a print friendly copy of this awesome lesson?! Thanks!
Rich
Wow, I’m blown away!
You have that certain ‘something’ for teaching.
Please dont stop
A HUGE thank you for your effort and time sir.
yeah i had to read it twice because there was so much useful info. thanks for sharing both your gift to teach and your musicianship with a complete stranger…we are all bound together as brethren with this music…whether it be funk or rock, blues or jazz, classical or folk. thanks again
FANTASTIC! Thank you so much for mapping this all out and explaining the concept in detail. This is EXTREMELY helpful!! Great site overall as well – you have a wonderful way of articulating the subject matter and are an outstanding teacher. 🙂
This is one of the most comprehensive lessons on soloing over key changes I have found, and I have looked a LOT for them. I realize it is a tough subject to explain but you did a great job. Thanks from us all.
Greaaaaaaaaaaaaaaaat lesson so so nice, thanks for your time man. greetings from Guatemala its there a seconde lesson for this
Great lessons. Thanks so much for this one and the minor pentatonic series. I’ve been learning the fretboard and soloing, and am so happy I came across this amazing material. It is the best I’ve seen at giving a coherent framework for how to approach soloing, and love the insights into using chord tones.
hey i jst saw this pentatonic lessson frm this websit….and i m thnking u for this lessson …as frm past sm days i m jst fnding smthng abt how to lead….n f9ly igot this websit….n thnks for ur lessson…grt usee..they are js incresing my knowldge on fret board 😉
Great article. Now I’ll have to try and implement it!
I have this article available in pdf format and feel like sharing it. For those interested I made it available at http://dl.dropbox.com/u/9955435/Soloing%20The%20Changes.pdf. All thanks go to the author of this article, Lee.
Wow super explainatory lesson. I want to know, what do you call these 5 minor scales in reference to the 7 major scale names ionian dorian fridgian lydian mixalydian aolian locrian. minor five positions are called????? I’m slightly confused and can’t find the imformation on line.Would they be taken out of the major ? still does’nt work? Help? anyone =Jamman=
The names you reference are complete scales, not pentatonics. They are based on different steps of a major scale. Normally you would take the first note of the scale as a tonal center, but these scales adapt it. Insead of (in C) c d e f g a b, d e f g a b c (the dorian mode). The notes stay the same, but the tonal center (first and last note) changes. This is only a very broad explanation, quite a lot more study is necessary to understand them theoretically.
this site is badass
that was great i now understand this shit
Great lesson, excellent presentation and charts and video! Thank you very much! I am working on my repetitions to get the experience into my fingers, only got about 9,999,900 to go! 🙂
Thanks Lee, I’ve been studying theory for two years, I just found your site. This lesson is only one of several great lessons I’ve used on your site. Thank you for the time you take to post these lessons. Awesome site.
I’m a 65 year old music lover who played some guitar back in the day.
I was self taught then , and played well enough to jam with other like minded people.
The relationships between scales, chords. was obvious by sound but I didn’t understand the math.
It’s been 24 years since I touched a guitar, and the time was right to pick it up again.
Have studied theory, the various scales, techniques in how to learn, since picking the guitar back up.
Your lessons. and especially this one, was light bulb turned on moment.
With the scale technique you made so clear and the use of arpeggio’s, I should be able to come up with
some nice sounding chord tone progressions accompanied with single tone progressions.
Thanks much and I hope you’re still rockin………..
Thank you Nilsin. Keep at it, more light bulb moments will come 🙂