Breaking down the pentatonic scale
One of the biggest problems with scale positions is if you’re not careful you might end up thinking about them in positions relative to each other, rather than independent scales. Whatever method you use, one thing that is very important is you always know where you are playing on the neck at any given moment. For example if you are playing position three and you only got there by counting up five frets from position one then this is a habit you need to get out of. If you happen to be playing A minor pentatonic in position three starting on the tenth fret then you should also be aware of where the root notes are within that shape as well as triads or any of the common chord shapes inside or within close proximity to it. Knowing these kind of target tones is the key to making your solos sound musical.
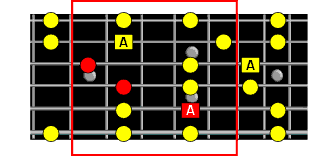
Position 3 A minor pentatonic starting on tenth fret

Root notes inside and within close proximity of the scale pattern

A minor triad inside the scale pattern
Some of the D minor (red) and A minor (green) form chords cross over into position 3
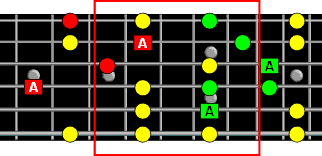
The above diagrams give you the idea, the main point is to always be looking for and knowing what’s around your fingers. There is nothing wrong with knowing and using the scale patterns themselves but thinking more about what is contained within and around them is very important if you want control of the neck. Obviously the same applies to all five positions.
Getting around the B string tuning.
This is an idea that takes a little getting used to but once you’re familiar with it, it can be a very powerful method for working your way around the neck and it outlines another importance of knowing all the notes on the fretboard. I’ll describe this all in the key of A using the minor pentatonic scale but the same method can be applied to any scale type. Breaking scale patterns into small chunks and moving them around is a great way to get familiar with a scale across the entire neck and get you away from thinking of scales as being full six string box patterns only.
We already know that the minor pentatonic scale contains only five notes so it’s quite obvious that all the shapes and positions are nothing more than repeats of the same five note sequences. This next idea thinks more in terms of small patterns repeated throughout the neck. The only thing that complicates it is the string tuning offset at the B string so first lets consider for a moment that all the strings on the guitar are tuned evenly.
In standard guitar tuning each string is tuned five semitones (half steps) apart, other than the interval between the G and B string.
All string intervals are five semitones except between the G to B string

If we now tuned the strings so that they are evenly tuned five semitones apart then a few things would change because the B and adjacent E string would need to be tuned up by one semitone (the B to E string interval is already tuned five frets apart so if the B string goes up then the adjacent E string will also have to go up with it). What we would end up with is a tuning that goes E A D G C F and any chord or pattern that we already know would have to change. Therefore the standard box pattern minor pentatonic would need to drop down by one fret on the B and E string to compensate.
Standard box pattern in standard tuning and what it would look like if all strings were tuned evenly spaced five semitones apart.

This is where the A notes would end up

It would now become a very easy task to take the first octave of the standard minor pentatonic shape and move it to start on any one of the root notes without needing to change the shape.
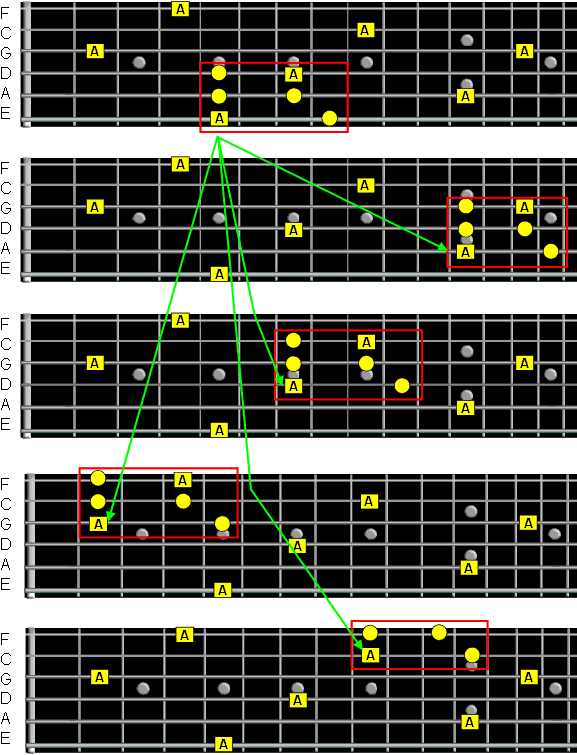
Obviously when we get down to the B string we start to run out of strings, we still keep the same pattern but we only use the first four notes of it. Likewise we could start it on the highest string and only need the first two notes.
Lets now take this one step further and think about how a pattern can move in four directions from any root note. It can move to or from the right or left ascending or descending like this.
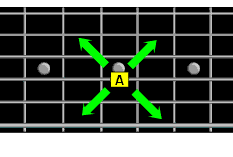
This means that we can learn just two small patterns and as long as we know where the root note is we can move from that note either up or down to the left or right. Even though this is four directions it’s only necessary to know two small patterns.
For example this one octave pattern can start from the lowest note and ascend up the octave or descend down.
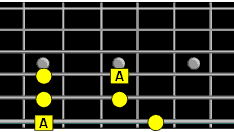
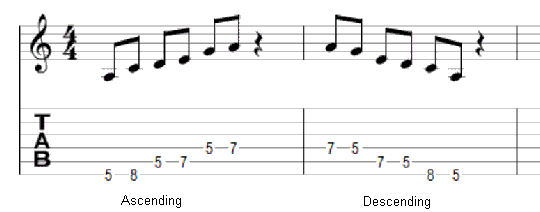
If we now take the first part of position five we can find another pattern that can be used for left ascending or right descending. For this pattern we will use eight notes to keep it symmetrical and make it easier to remember. This obviously goes against what I said earlier about all patterns should start from the root so again, when practicing these kind of patterns, start from the root, go up and then work back down and vice versa.
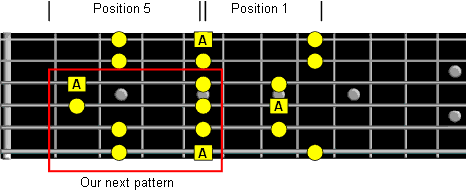
And here it is played ascending and descending, starting and ending on the root.


With these two patterns we can now go to any root note and play from it in any of four directions.
Between any 12 frets you will only find six root notes, one on each string. By knowing just the location of the root notes and the two patterns you have enough information to play the minor pentatonic scale across entire neck.
For these examples remember we are still considering all the strings to be tuned evenly. Study the diagram below and you will see how the entire neck is covered simply by repeats of the same two patterns centred around the root notes. I have outlined as many as I can without it becoming too cluttered but you should have no problem seeing they are all there.

This shows us how simple it would be if the strings were all tuned evenly. A system like this can be very helpful when combined with the ideas already discussed and help you to gain good control of a scale.
Okay so this is all well and good but how does it help us in standard tuning?. Well, it’s not really much more difficult once you understand how the strings are tuned and the whole thing is made much easier as long as you only start with patterns that belong to the evenly tuned strings E A D and G as this gives us a constant to work from (which we have already done).
Basically, we can take any part of any scale pattern we like as long as it belongs to the bottom four strings and move it anywhere on the neck in standard tuning by following two rules.
1. Any part of the pattern that crosses the G to the B string ascending needs to move up one fret
2. Any part of the pattern that crosses the B to the G string ascending needs to move down one fret
Rather than attempt to over explain this it is probably easier to get the idea by studying the following series of diagrams, we start by taking the first pattern and moving it to start on each string in turn.


Note in diagram 5 there is no need to shift anything as the B to E spacing is still tuned five semitones. Also note that diagrams 3 and 4 could be viewed as descending and shifting down as you cross the B to G string as shown below.

Using pattern two


This same idea could also be used with larger patterns but sticking to the patterns belonging to the E A D G strings prevents it getting messy and confusing because some of the pattern already crosses the unevenly tuned part. If you move the full standard box pattern to start on the fifth string then you have to think more, for example in the diagram below, the dotted section of position 1 already crosses the G-B strings so it needs to be compensated on both the B and E strings when it is moved. Reusing patterns from the evenly tuned part not only keeps it simple but also helps you to think more about the scale notes rather than the pattern, although this might not seem obvious until you get used to it.

Moving some of these patterns around can require a little more thought than others but a little bit of effort and practice can make this method become very easy for a large percentage of pattern shifts. I have been using ideas like this for quite some time and can move any pattern around the neck in this way with very little thought. Like everything else you don’t get used to it overnight but once you will find it a great way to quickly think your way around an unfamiliar scale and it should speed up the process of learning new scales across the fretboard. All the common scale positions should still be learnt but combined with this idea you should find yourself learning and remembering them become a lot easier.
If you have any trouble trying to get your head around any of this then you might find it easier to first play around with smaller groups of four notes and then when you get the hang of that move on to six note symmetrical patterns.
For example, take this four note pattern here…
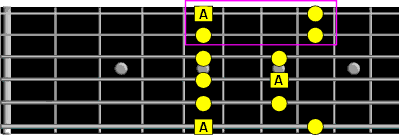
…and move it around the neck to start on each of these root notes.


By using only a two string pattern of four notes you can see that you only need to think about the string offset where the pattern crosses the G – B string as outlined in the orange box. Also note that these four notes alone make up an Amin7 chord so this method could be used as a means of quickly locating chord tones.
The next few diagrams show how to play about with a symmetrical pattern, this helps you get used to the idea and prepare you better for when using larger patterns like the ones we first looked at.
Take this symmetrical pattern from the standard box position and move it to other root notes across the neck


If you are finding your ideas limited when playing with any of the pentatonic positions other than position 1 then you might find you can jump start your creativity by taking a lick you already know and replicate it in another position. Unless you are new to lead playing it is pretty likely that you already have a pretty good sounding lick that uses this one of the outlined parts of the standard box position.
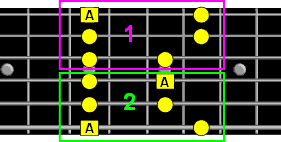
The diagrams below show the first part located in each of the five positions, note that position four only contains four notes so you might need to adjust your lick to only use four notes.

These diagrams show the second pattern, this time position 3 only contains four of the notes so a different lick is required again.

The more you practice and play about with ideas like this the better. So far we have covered quite a few different ideas but don’t allow yourself to get overwhelmed by any of it, make sure you practice them regularly and let things just fall into place on their own, what might seem like a lot of information right now will soon become second nature to you.
Thank you so much for this lesson on mastering the pentatonic scales.By your putting the different positions in color and arrowing what is related,it has been like”oh,so that’s what I’m supposed to do”.
Again,thanks so much for opening a few doors for me.
Tantastic these lessons on mastering the pentatonics. Thanks so much.
What’s the logic behind the chords cross over into position 3 (or pos. 4, 5, 1 and 2)? In the ex. above you’ve chosen some of the D minor (red) chords (R-5 and then R-b3). You’ve also chosen some different sequence of the A minor (green) chords (R-4-5 and then R-b3-5). How do I know the right chords for the best cross over within patterns?